
Gradle没有将gdbserver打包到apk中。ndk-gdb导致“错误:目标设备上安装的不可调试应用程序”。
在AndroidStudio0.6中,我创建了一个使用JNI包装的非常简单的C函数的Android测试项目。我在android:debuggable="true"中设置了AndroidManifest.xml。
我运行了ndk-build NDK_DEBUG=1。这在正确的位置生成了一个gdbserver和一个gdb.setup文件。
然而,当我在Android中构建这个项目并运行ndk-gdb --debug时,我得到了以下输出:
Android NDK installation path: /usr/local/android-ndk-r9d
Using default adb command: /Applications/Android Studio.app/sdk/platform-tools/adb
ADB version found: Android Debug Bridge version 1.0.31
Using ADB flags:
Using JDB command: /usr/bin/jdb
Using auto-detected project path: .
Found package name: com.example.testndk.app
ABIs targetted by application: armeabi-v7a
Device API Level: 19
Device CPU ABIs: armeabi-v7a armeabi
Compatible device ABI: armeabi-v7a
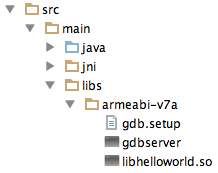
Using gdb setup init: ./libs/armeabi-v7a/gdb.setup
Using toolchain prefix: /usr/local/android-ndk-r9d/toolchains/arm-linux-androideabi-4.8/prebuilt/darwin-x86_64/bin/arm-linux-androideabi-
Using app out directory: ./obj/local/armeabi-v7a
Found debuggable flag: true
Found gdb.setup under libs/armeabi-v7a, assuming app was built with NDK_DEBUG=1
Found data directory: '/data/data/com.example.testndk.app'
ERROR: Non-debuggable application installed on the target device.
Please re-install the debuggable version!我查看了生成的apk,以确保gdbserver在那里,但是我找不到gdbserver或gdb.setup文件!他们去哪了??看来gradle没有把它们打包在我的口袋里!
这是我的build.gradle
apply plugin: 'android'

android {
    compileSdkVersion 19
    buildToolsVersion "19.1.0"

    defaultConfig {
        applicationId "com.example.testndk.app"
        minSdkVersion 9
        targetSdkVersion 19
        versionCode 1
        versionName "1.0"
    }

    sourceSets.main {
        jniLibs.srcDir 'src/main/libs' // use the jni .so compiled from the manual ndk-build command
        jni.srcDirs = [] //disable automatic ndk-build call
    }

    buildTypes {
        release {
            runProguard false
            proguardFiles getDefaultProguardFile('proguard-android.txt'), 'proguard-rules.pro'
        }
    }
}

dependencies {
    compile fileTree(dir: 'libs', include: ['*.jar'])
    compile 'com.android.support:appcompat-v7:19.+'
}如何让gradle在我的apk中正确地打包gdbserver?如果你想自己尝试,我把完整的源代码放在github上。https://github.com/cypressf/testndk
回答 6
Stack Overflow用户
发布于 2014-06-12 08:50:04
我也做过同样的实验。设置如下:
android{
  buildTypes {
    debug {
        jniDebuggable true
    }
  }
}
不会有帮助,因为你不依赖于android插件NDK集成。
一种(不太好的)解决方案是在安装apk之后,手动将gdbserver和gdb.setup文件复制到设备上的应用程序的nativeLibraryPath目录中。
Stack Overflow用户
发布于 2014-06-18 12:34:59
我也有同样的问题。
=Way 1=
由于gdbserver名为“gdbserver”,而不是“gbdserver.so”,所以不能将它安装到APK中。我们可以这样做:http://ivansotof.com/2013/12/including-native-so-libraries-in-android/,最后我们可以确保APK包含APK/lib/ABI/gdbserver中的gdbserver。
=Way 2=
@ph0b的答案对我的项目很有用,而且很有用!我的等级是v1.2,com.android.tools.build:gradle:0.10.+‘祝你好运,我的朋友。
一些有用的链接:http://ph0b.com/android-studio-gradle-and-ndk-integration/
Stack Overflow用户
发布于 2014-11-12 19:01:25
我也遇到了同样的问题,并通过这样修改"packageProductFlavorJniLibs“任务(build.gradle中的android部分之后)解决了这个问题:
Sync packageTask = project.getTasks().findByName("packageDebugJniLibs")
packageTask.include(['**/gdbserver', '**/gdb.setup'])
如果您在ex.:演示中使用产品口味,则必须修改两个名称为packageDemoDebugJniLibs和packageFullDebugJniLibs的任务。
//编辑:您还应该添加一个导入:
import org.gradle.api.tasks.Sync但是,如果您编写def packageTask =.
https://stackoverflow.com/questions/24166562
复制相似问题
腾讯云开发者

Copyright © 2013 - 2026 Tencent Cloud. All Rights Reserved. 腾讯云 版权所有
深圳市腾讯计算机系统有限公司 ICP备案/许可证号:粤B2-20090059 ![]() 粤公网安备44030502008569号
粤公网安备44030502008569号
腾讯云计算(北京)有限责任公司 京ICP证150476号 | 京ICP备11018762号