[ANT]apache ant 安装说明

[ANT]apache ant 安装说明

master336
发布于 2026-06-15 19:54:03
发布于 2026-06-15 19:54:03
开始安装
下载
目前官网提供的下载版本为1.9.x 1.10.x,ant的安装方式跟jdk的离线安装类似
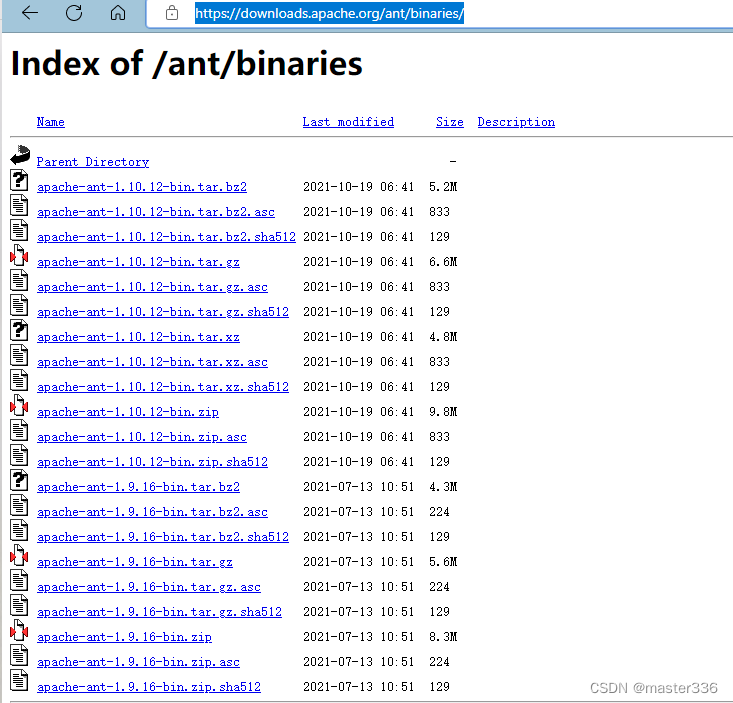
在这里插入图片描述
解压
解压下载的ant包到安装位置
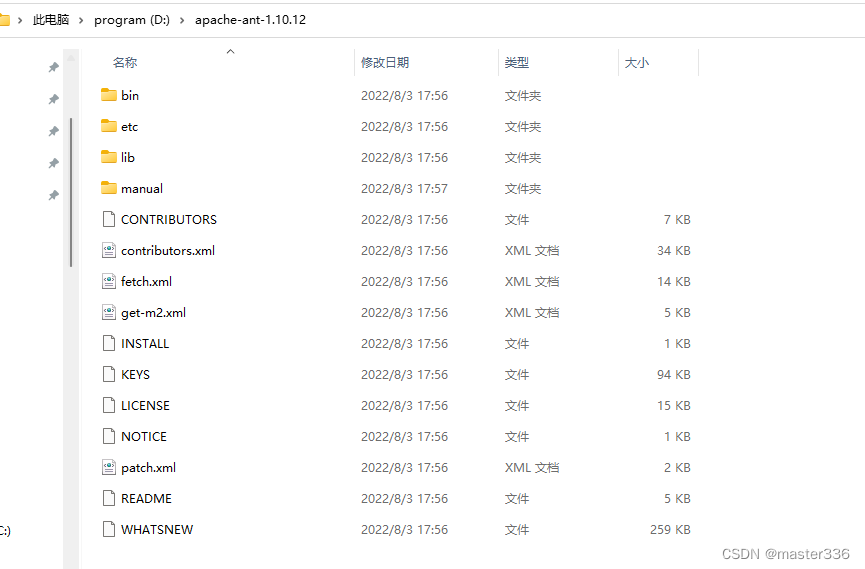
在这里插入图片描述
安装
https://ant.apache.org/manual/install.html#installing
ant的安装过程为配置ant命令可执行的过程 同时需要配置环境变量ANT_HOME 、CLASSPATH
以下摘自官网

在这里插入图片描述

在这里插入图片描述
- ANT_HOME : 设置ant 安装根目录
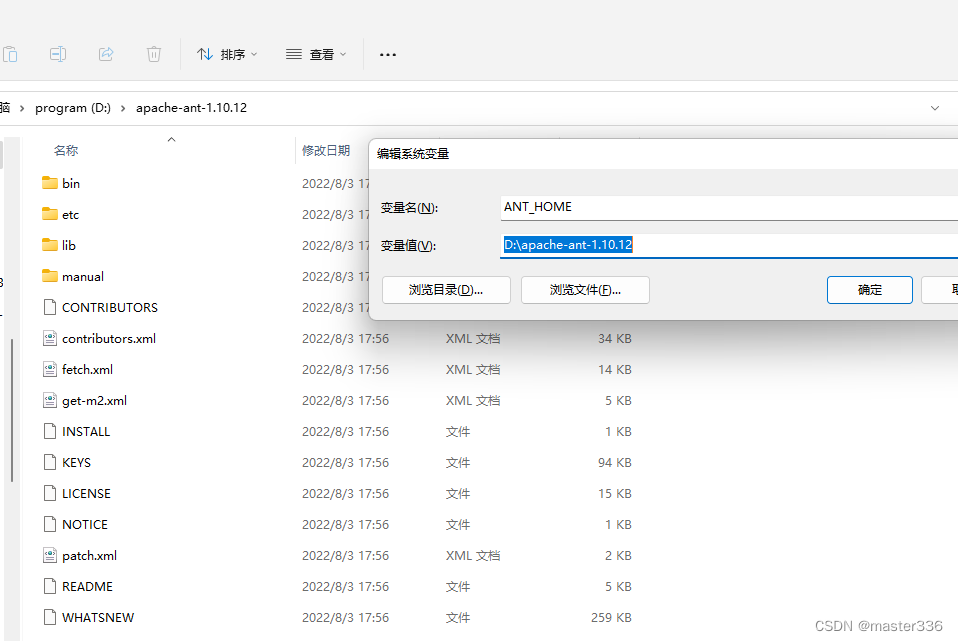
在这里插入图片描述
- CLASSPATH: 设置依赖库,ant lib目录所在目录
(注意不要覆盖JAVA lib/tools\rt的设置) classpath的目录官方的安装文档中标注需要,但实际测试中可能并不需要,尽管如此依然建议进行配置,Linux环境下跳过
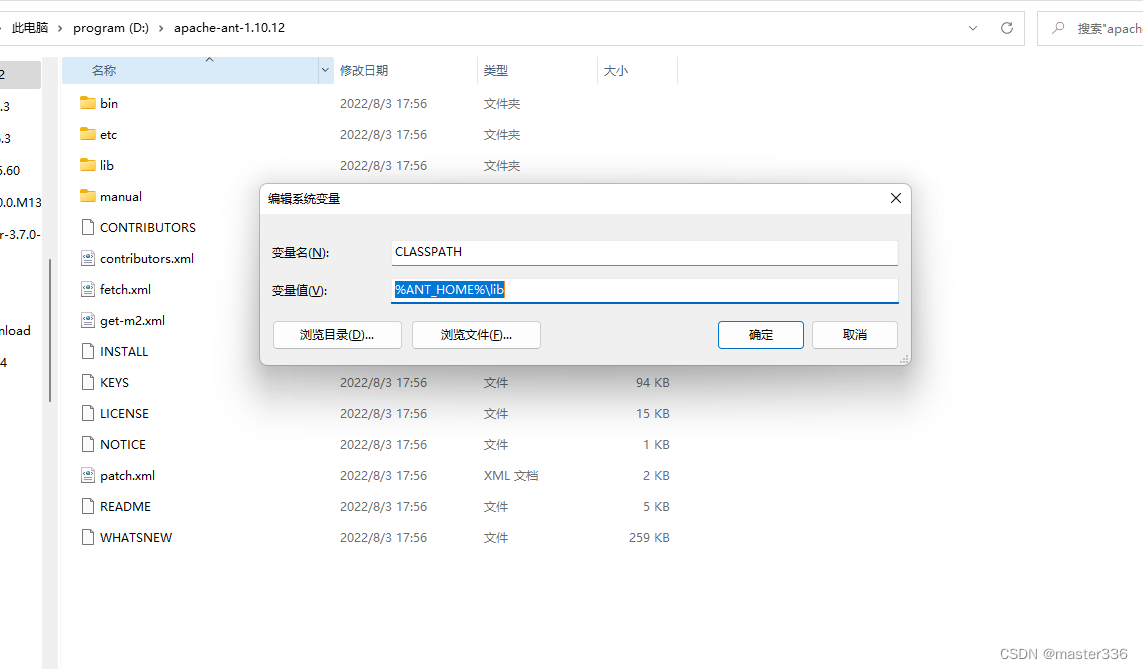
在这里插入图片描述
- bin: 设置可任意位置执行 添加 %ANT_HOME%\bin 到PATH路径(或者ant全路径亦可)下(linux下可创建软连接)
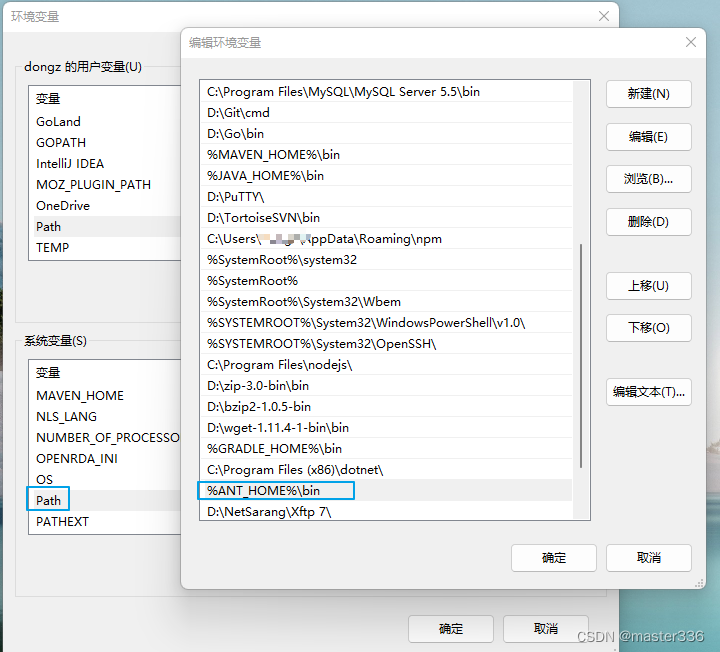
在这里插入图片描述
验证
ant安装依赖jdk(java.exe)、依赖lib及path的配置;
- 当提示找不到ant命令时
- PATH环境变量中未正确配置ant安装路径的bin目录,无法识别ant命令来源
- “java.exe” 不是内部或外部命令,也不是可运行的程序或批处理文件。 找不到命令
- jre配置错误,检查PATH及JAVA_HOME的配置
- ClassNotFoundException等java异常
- CLASSPAT、ANT_HOME配置错误,没有找到ant执行所须的依赖jar包
正确配置是命令路径可被找到
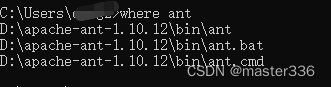
在这里插入图片描述
使用
版本查询
ant -version
在这里插入图片描述
编译打包
#默认使用build.xml
ant
#使用非默认build.xml 文件通过-f指定
ant -f mybuild.xml
示例
基于官方提供的build修改示例
增加classpath的设置说明(四种方式)
<project name="MyProject" default="dist" basedir=".">
  <description>
    simple example build file
  </description>
  <!-- set global properties for this build -->
  <property name="src" location="src"/>
  <property name="build" location="build"/>
  <property name="dist" location="dist"/>
  <path id="classpath3d">
    <fileset dir="lib" erroronmissingdir="false">
      <include name="*.jar"/>
    </fileset>
  </path>
  <property name="classpath3d" refid="classpath3d"/>
  <target name="init">
    <!-- Create the time stamp -->
    <tstamp/>
    <!-- Create the build directory structure used by compile -->
    <mkdir dir="${build}"/>
  </target>

  <target name="compile" depends="init"
        description="compile the source">
    <!-- Compile the Java code from ${src} into ${build} -->
    <!--1. 通过变量设置 -->
    <!--<javac srcdir="${src}" destdir="${build}" classpath="${classpath3d}"/>-->
    <javac srcdir="${src}" destdir="${build}">
      <!--2. 通过引用设置 -->
      <!--<classpath refid="classpath3d"/>-->
      <!--3. 直接写明 -->
      <!--<classpath path="lib/mysql-connector-java-8.0.29.jar"/>
      <classpath path="lib/ojdbc8.jar"/>-->
      <!-- 4. 聚合 -->
      <!--<classpath>
        <fileset dir="lib">
          <include name="*.jar"/>
        </fileset>
      </classpath>-->
    </javac>
  </target>

  <target name="dist" depends="compile"
        description="generate the distribution">
    <!-- Create the distribution directory -->
    <mkdir dir="${dist}/lib"/>
    <copy todir="${dist}/lib">
       <fileset dir="lib" erroronmissingdir=""/>
    </copy>
    <!-- Put everything in ${build} into the MyProject-${DSTAMP}.jar file -->
    <jar jarfile="${dist}/MyProject-${DSTAMP}.jar" basedir="${build}"/>
  </target>

  <target name="clean"
        description="clean up">
    <!-- Delete the ${build} and ${dist} directory trees -->
    <delete dir="${build}"/>
    <delete dir="${dist}"/>
  </target>
</project>
编写测试代码
src下编写java代码 示例
//src/A.java
public class A{
	private String var1;
	private String demo(String args){
		System.out.println(args);
		return "OK";
	}
}
目录结构示例
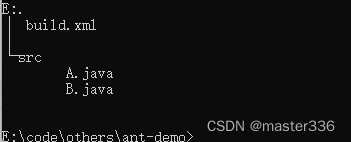
在这里插入图片描述
编译打包
ant编译完成目录结构示例:
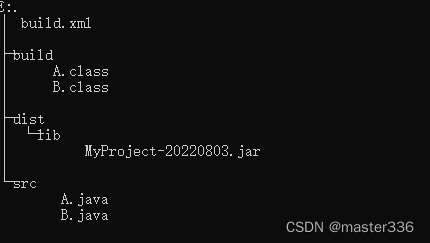
在这里插入图片描述
本文参与 腾讯云自媒体同步曝光计划,分享自作者个人站点/博客。
原始发表:2023-05-16,如有侵权请联系 cloudcommunity@tencent.com 删除
评论
登录后参与评论
推荐阅读
目录
腾讯云开发者

Copyright © 2013 - 2026 Tencent Cloud. All Rights Reserved. 腾讯云 版权所有
深圳市腾讯计算机系统有限公司 ICP备案/许可证号:粤B2-20090059 ![]() 粤公网安备44030502008569号
粤公网安备44030502008569号
腾讯云计算(北京)有限责任公司 京ICP证150476号 | 京ICP备11018762号